I tried installing h5ai, but it would not work. The runtime environment itself looked fine: every check on the info page was green.

By default, h5ai opens to a login or landing page. You can change that page, or set the preferred default index. The /_h5ai path assumes h5ai lives in a subdirectory; adjust it if you installed it at the root. The exact setting depends on the web server:
Apache httpd
Put this in .htaccess:
DirectoryIndex index.html index.php /_h5ai/server/php/index.php
lighttpd
Put this in lighttpd.conf:
index-file.names += ("index.html", "index.php", "/_h5ai/server/php/index.php")
Nginx
Put this in the site .conf file:
index index.html index.php /_h5ai/server/php/index.php;
Cherokee
Put this in cherokee.conf:
vserver!1!directory_index = index.html,index.php,/_h5ai/server/php/index.php
Most other settings are left at their defaults. If you need custom behavior, adjust conf/options.json.
On Synology, the Apache httpd package is a special case. Web Station shows that Apache 2.4 is installed, but it does not give you a place to edit the Apache configuration. For that you have to SSH into the NAS.
A common reason to do this is URL case sensitivity. In a default setup, Apache treats URLs as case-sensitive, so /phpmyadmin and /phpMYADMIN are not the same. To turn that off, you need to edit httpd.conf directly. Web Station may let you change PHP environment variables, but it does not expose the Apache config file.
Get root access with PuTTY
The Apache config is read-only, so an admin account cannot edit it. You need root. On DSM 6.1 this method still works.
- Download PuTTY.
- Connect with
admin. - Enter the admin password. The password field may not show any feedback while you type.
- After login, run
sudo su -. - Enter the admin password again.
- Run
synouser --setpw root xxx, replacingxxxwith the root password you want.
At this point the root account has a password.
Edit the Apache config with SecureCRT
Open your SSH client and log in as root with the password you just set. You only need two commands for this job: ls to list directories and vi to edit a file.
Open the config file. The example below uses the Apache 2.2 path; for Apache 2.4, look for the matching httpd24.conf in the Apache2.4 package.
vi /volume1/@appstore/Apache2.2/usr/local/etc/apache22/conf/httpd22.conf
If DSM changes the package layout, use ls to find the right directory. For example, ls /volume1/@appstore/ shows the installed packages, and you can keep expanding from there.
Once the file is open, press i to enter edit mode and use the arrow keys to move around. Two changes are needed:
- Add the spelling module:
LoadModule speling_module modules/mod_speling.so
- Inside the relevant
Directoryblock, add:
CheckSpelling On
Press Esc, then Shift + :, and enter wq! to save and quit. Stop and start Apache in the package center, and the change should take effect.
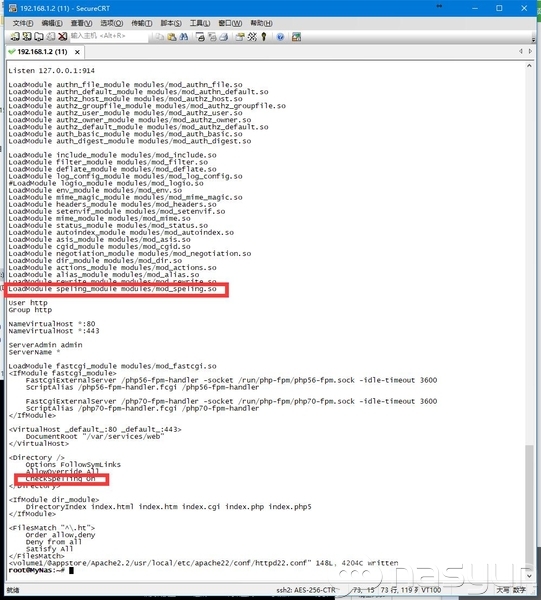
After that, both http://url/phpmyadmin and http://url/phpMYADMIN should work.
I found SecureCRT awkward. It is a DOS-like interface, and you have to use cd, ls, and vi. For example, ls /volume1/@appstore/ showed apache2.4, but cd /volume1/@appstore/apache2.4 would not take me there. I am not sure whether that was a permissions issue.
A different route to root
Another approach is to log in over SSH as admin, then run sudo -i and enter the admin password. Next run:
chmod 7777 /etc/ssh/sshd_config
Press i to edit, change the PermitRootLogin value from without-password to yes, and remove the comment marker in front of the line. Save with Esc, then :wq!.

Restart SSH afterward, either by restarting the service or by turning the SSH option off and on again in DSM.
The without-password value understandably raises a question: does it mean no password? The procedure also changes the permissions on the config file. It is a blunt way to enable root login, but it is what this route does.
A graphical client makes this less painful. With WinSCP, you do not have to test every command by hand just to see whether your edits took effect.
Set the root password
Log in as admin, run sudo -i, and enter the admin password. Then run:
synouser --setpw root xxx
Here xxx is the root password you want to use.
Connect with WinSCP as root
Use the root account and the password you just set.

The connected view looks like this:

If it still does not work
In DSM, open the advanced settings.
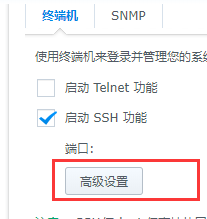
Set the relevant security level to Low.

Try again. If it still fails, restart the NAS and try once more.
Once you can control the environment files directly, Synology packages can handle the runtime. Docker images feel heavier for this kind of setup: instead of reusing the same environment, each container runs its own, which wastes resources.